I've recently taken up learning sign language and as a way to practice I started using it in the classroom when speaking to my students. At first this was solely for selfish reasons. I wanted to hone my sign language skills, and there is no fear when practicing in front of kindergarteners. They love everything I do because they are five and everyone loves their teacher when they are five. In addition, by learning some signs and finger spelling my students would be able to communicate and connect with those in the Deaf Community, who often feel isolated from the hearing community. We have a couple of deaf students at our school and a few that are hard of hearing, and I felt that it was important for my kids to be able to communicate and include these students when they interact with them.
Even though my incorporation of sign language into daily classroom activities was for my own reasons I have since found that it is an incredibly useful teaching strategy. My entire career I have worked with ELL kids, so I am constantly talking and teaching with my hands. However, by using sign language, instead of random hand movements coinciding with what I am saying now it is consistent signs and movements that represent the words that I am speaking. Even if a kid doesn't understand that words, he or she may be able to gather understanding from the signs. Sign language helps to create a bridge for those learning English.
Sign language is great for all learners too, not just the ELL. Sign language is a visual and kinesthetic language. By teaching the ASL alphabet my students now have a visual and hands-on representation of letters. Also, a lot of the time teacher directions are solely oral. By simultaneously signing while I give directions it helps to give an extra support to my students in understanding what they are expected to do. One way I have seen that this has been helpful is during assessments. In Kindergarten all assessment are performance based and are given one to one. At the beginning of the quarter I gave my students an assessment on comparing numbers. My expectation was that a lot of students wouldn't do too well on the assessment and I would have to reteach the concept later on and retest a lot of the students. During all of the lessons a majority of the students struggled with the concept. Comparing numbers is a difficult concept for little minds and they especially struggle with the meaning of "less" when comparing numbers or quantities. To my surprise most of the students in my class got a 100% on the assessment. When I reflected on the results afterwards I realized that the difference between administering the test this year and lasts years was that this time I signed all of the directions. I couldn't help but wonder if the extra support of using sign language helped my students be successful.
Sign language also is a great strategy for classroom management. I love using nonverbal cues in my classroom. It keeps the noise level down and minimizes interruptions. For years I have taught my kids to ask for water or to use the bathroom using signs. When they want water they hold up a "W". When they need to use the bathroom they hold up the finger spelling for "t" and rotate it back and forth (This is the sign for bathroom/toilet in ASL). My goal this year is to be able to give my students a simple set of directions using only signs. By omitting verbal directions and only giving signs students are then forced to "listen" with their eyes. Let's face it, a lot of us "listen" to directions without really listening. The same is true with Kindergarteners. However, when communicating with signs you HAVE to look at the person. It requires a lot more focus on the "speaker" to understand what is being said.
Learning sign language and teaching it to my students has been one of the best things I have done for my students. Not only is it a beautiful language, but also it is a great teaching strategy for multiple reasons. Most of all though, I believe that it will help my students to become more well-rounded human beings.
Complete

Thursday, December 1, 2016

Monday, July 18, 2016
Gotta Catch 'Em All!
With "Pokemon Go!" being such a huge hit right now, I thought it would be fun to do a Pokemon theme for my classroom. I wasn't sure at first if it was something that my upcoming Kindergarteners would be interested in, until I was reminded by colleagues that I had some very Pokemon-obsessed kids in my class last year. (Oh how quickly we forget!)
There is little out there in the worldwide web that I could find that was Pokemon themed for a classroom. So, I created my own and decided to share it so others who are interested in "cashing in" on the Pokemon craze can have these resources too :)
The first thing a teacher needs is cute nameplates for student desks! I even downloaded the Pokemon font to use. It worked well for the numbers, but decided to go with a more "regular" font for the letters. This is Kindergarten after all... don't want to confuse anybody!
 Next comes the name tags. These will be places in to badge holders with kids to wear.


There is little out there in the worldwide web that I could find that was Pokemon themed for a classroom. So, I created my own and decided to share it so others who are interested in "cashing in" on the Pokemon craze can have these resources too :)
The first thing a teacher needs is cute nameplates for student desks! I even downloaded the Pokemon font to use. It worked well for the numbers, but decided to go with a more "regular" font for the letters. This is Kindergarten after all... don't want to confuse anybody!

I needed new bathroom passes for this year too. In previous years when kids went to the bathroom they placed a little figurine on their desk, one for boys and one for girls. That helped me to see that someone was already in the bathroom (because I forget!). The little statues that I have been using are falling apart and this seemed like a good opportunity to "renovate" this idea. I created Pokemon bathroom passes. I will print these out and tape the girls' one to a pink cup and the boys' one to a blue cup. This will be my new visual to remind me that I already sent someone to the bathroom. Since I teacher Kindergarten I have two small bathrooms in my classroom. I will cut off the word "pass" on these, and then attach them to the bathroom doors as well.

This year I wanted to trade out the "junk" in my treasure box for some cool (and free for me!) coupons for the kids. In light of this year's Pokemon theme I decided to make Pokemon cards with prizes attached. Now kids can earn points and try to collect them all!
At our school we started doing a "Warrior Connect" each day. It's a way for the kids to check in first thing in the morning and gives us an idea of how everybody is doing. (It also gives the kids an opportunity to see how their teacher is feeling each morning!) It is supposed to be a 1-5 check in, with 1 being the worst and 5 the best. For Kindergarten I start with a 1-3 check in. So, I made a Pokemon themed poster to help the kids tell how they are feeling each morning.

The thing that I am probably MOST stoked about is my Class Dojo (online classroom management tool) this year. I discovered that you can upload your own pictures to be used for the kids' avatars! Click on the "settings" icon in the top right corner of your class. Click on a student and then click on their avatar (like you are going to change it) From the drop down menu choose "Create new set". Then you can download whatever pictures you want. (And they don't even need to be Pokemon!) I went to the Pokemon Database and downloaded the pictures that I liked. I tried to choose ones that were small and cute, cause this is Kindergarten after all! And then I uploaded them all at once to ClassDojo. I now have 45 Pokemon characters in holding to assign my kids. And one of "prizes" they can earn is to change their Pokemon character (see above).
Here is the link to download these materials: Pokemon Classroom Materials If you want to use the Pokemon font you will need to download it to your computer. You can do that here: Pokemon Font
Enjoy!!!!
Saturday, August 29, 2015
Educational Songs
After 6 years of teaching the second year Kindergarteners and then looping with them to first grade I am back to teaching regular, old Kindergarten again. It has been a crazy year so far! I love my class, and we are all finally getting into the routine of being in school, but it is exhausting! Those kids have SO much energy. I swear, they never get tired!
Phonics:
Following Directions: (The kids are always begging me to do this one!)
We use these videos and others from GoNoodle every morning to start our day, after every morning recess, every day after lunch, and any other time the kids (or I!) just need a break! I'm pretty sure we could do this for 6 straight hours at school and the kids would STILL be full of energy!
If you live or work with kids I would definitely recommend that you check out GoNoodle, and don't forget to add your own videos too!
With 24 high energy students GoNoodle has been my saving grace. I love it! It is an awesome website with lots of brain break videos for kids. They have everything from Zumba, to camp songs, to yoga. And the best part... it's completely free!
One of my favorite components to GoNoodle is the YouTube channel. You can save youtube videos straight to your GoNoodle account. Under the YouTube channel on GoNoodle, just click on "Add Your Own YouTube Video". Then, copy and past the URL of the YouTube video. And you're done! I've found lots of great educational song videos that I saved to my GoNoodle account and play with my class every day. Song and movement is such a great way to learn!
Here are some of my favorite videos we use in class...
Math:
Phonics:
Following Directions: (The kids are always begging me to do this one!)
We use these videos and others from GoNoodle every morning to start our day, after every morning recess, every day after lunch, and any other time the kids (or I!) just need a break! I'm pretty sure we could do this for 6 straight hours at school and the kids would STILL be full of energy!
If you live or work with kids I would definitely recommend that you check out GoNoodle, and don't forget to add your own videos too!
Monday, July 13, 2015
Phycronutrients!
This summer Kory and I have taken up a new interest in watching food and health documentaries. We've watched quite a few this summer; some we liked more than others. The most recent one we watched was "Fat, Sick, and Nearly Dead". It's about a guy from Australia who goes on a 60 day road trip of the US while doing a 60 day juice cleanse as an attempt to heal an autoimmune disease he has by consuming solely fruits and vegetables. It is a great documentary and I highly recommend it! (It's on Netflix!)
Kory and I were so inspired by this documentary that we decided to give the juicing thing a try. Since we are just starting out with juicing we didn't want to spend a ton of money on one, though we know you get what you pay for. But I've learned a thing or too about getting great deals when shopping! We found one that had high ratings and was reasonably priced at Target. However, I found that it was like $20 cheaper online than at the actual store! (The woes of living in Hawai'i). We tried to order it online using ebates (why not get some cash back on it!) and then just pick it up at the store later that day (and save on shipping!). Unfortunately, it was out of stock online, and even though we wanted to just do a store pick up, it wouldn't let us order it on online. I was pretty ticked off. The good news is that Target does price matching! So we just went back to Target, grabbed the juicer, took it to customer service and said we wanted the online price. Bada bing bada boom! We just got ourselves a high quality juicer for under $50!
Okay, enough of my tangent on bargain shopping...
We love our juicer! We tried to do just juice for a couple days. It was really hard. For now we are just using it to replace a meal instead of all of our meals. Like for breakfast today! My favorite is apple, carrot, and beet. It is SO good! I also found that juices with beet were also the most filling!


We tried using cucumber in our juices, but found it to be really overpowering. Kory even tried bell pepper and onion in his one time. (Meh!) He is much braver and much more experimental than me!
I have to make one more tangent here... We are composting the fibers left over from juicing, and yesterday I found this little guy IN the compost box.

So among other things I have now added placing a lid on the compost box to my to do list today.
Juicing can get expensive, which is why we got our produce at the farmers market and Costco. (Apples, carrots, celery are all dirt cheap at Costco!) And after seeing how costly juicing is on a first hand basis it makes us all the more glad that we have our JuicePLus+. It's so much cheaper than juicing all the time and we still get all our phytonutrients and micronutrients. Or as Kory has dubbed them: phycronutrients!
Monday, June 22, 2015
Time for Thai!
The one thing we are not short on here in Kona is Thai food restaurants. They remind me of taquerias back in California... They're everywhere. For me though Thai food was always the last choice when it came to eating out. In the past 7 years while living here I think I've only eaten it once. However, Thai food is one of my husband's favorites, and over the past year of being married to him it has slowly become a favorite of mine too.


I have fallen in love with the spicy, peanuty, coconuty flavors of their curries. And my husband loves pad thai! So, we decided to see if we could make it ourselves! For this we turned to Pinterest (of course). Our criteria was EASY. Neither one of us like to hassle with tons of ingredients. The recipe we used can be found here: Quick and Easy Vegan Pad Thai
The noodles for pad thai are the best! We just soaked them in hot, boiling water for about 15 minutes.
Then we sautéed up some garlic and tofu. My husband likes his tofu in tiny bite size pieces, so chopping that up was his job.
He also helped squeeze the limes for the sauce. Add in some peanut butter, soy sauce and sriracha and you've got a mighty fine pad thai sauce!
Mix it all together in a skillet and you've get some quick and easy pad thai! I garnished mine with a little green onion, cilantro, and chopped peanuts.
This recipe made so much that we have plenty for dinner tomorrow too! Homemade thai leftovers, mmm mmm! This recipe was so easy and so quick we will definitely be making it again soon. Next on the list... Panang Curry!!!!
Friday, June 12, 2015
Classroom "Essentials"
Usually at the end of summer, about a week before I have to return back to work, I begin to have dreams about school: setting up the classroom, first day of school, etc. I've always believed it is my subconscious's way of preparing me for the reality of work and to soften the blow of summer break coming to a halt.
However, this year I have been having school related dreams during the first week of summer vacation. What is up with that! Maybe it's the anticipation of moving to a new grade level as well as a new classroom next year, I don't know. So, after awaking this morning from a dream about desk arrangements, I decided to put this school focused brain activity to work...
This year I learned about an amazing site called PledgeCents. If you are a teacher you have probably heard of the grant writing site called DonorsChoose. PledgeCents is just like that... but even better! Unlike DonorsChoose you are not restricted to fundraising for items from a limited number of companies. They also don't tack on extra fees of shipping, handling, and donations to their site. With PledgeCents you get the money sent you to use as you need - potentially putting that money in to your local economy. This morning I created a cause on PledgeCents in the hopes of raising funds to purchase a diffuser and essential oils in my classroom. Essential oils can boost energy in the afternoon, help awaken in the morning, and even help foster social interactions amongst students.
If you are interested in essential oils in the classroom or PledgeCents, be sure to check out the video and link below!
PledgeCents - Classroom "Essentials"
And maybe now I have gotten this idea out of my head and in to action I can start to enjoy summer with some school-free sleep!
And maybe now I have gotten this idea out of my head and in to action I can start to enjoy summer with some school-free sleep!
Sunday, June 7, 2015
Molten Chocolate Lava Cake
I learned how to make the most AMAZING dessert this weekend! Molten Chocolate Lava Cake. Yummy!


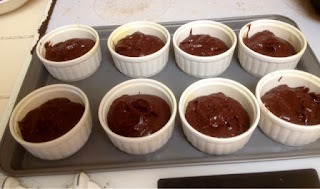


First you need a bunch of chocolate and a TON of butter. The store was out of Bakers bittersweet chocolate, so I got Ghiradelli bittersweet chocolate chips. I used about a 1 1/4 cup of the chips, 2 oz of semi-sweet chocolate and 1 1/2 cup of butter. So much butter!
Then I microwaved it for 90 seconds (30 seconds first followed by 60 more seconds). Stirred it all together and made the most decadent liquid substance ever!

Then I added my dry ingredients and a bunch of eggs. The recipe calls for 3 eggs AND 3 eggs yolks. Usually, when a recipe calls for egg whites or egg yolks I give it a pass... too much work! But for this, it seemed worth it! Finally, I placed the mix in 8 ramekins.

I then placed them in the fridge to save or later... You have to eat them right out of the oven!
When it came time to eat them I placed them in the oven for 12 short minutes. I then had delicious, gooey, yummy lava cakes!

We ate them right away, and I wasn't able to get a picture. This was one of the left overs so it is a little deflated.
But top it off with some ice cream and no one will ever know!
Below is the link to the recipe that I used. It is so simple and so easy and SO delicious! It is a real crowd pleaser!
Sunday, May 3, 2015
Star Wars Party
If you didn't know already, Monday, May 4th was Star Wars Day (May the 4th be with you!)
My husband and I thought it would be fun to throw a Star Wars party.
To begin, we dressed our dogs up in their Star Wars costumes from Halloween. Our dogs, Boba and Chewy, even have Star Wars names! (Boba Fett; Chewbacca)
Aren't they adorable!

My husband wanted to add his own special touches to the party so he used a pair of chopsticks to create a light saber for our Dartg Vader clock.

In addition to watching the original Star Wars - Episode IV A New Hope, we had our friends bring Star Wars themed foods. One our friends is a chocolatier and made these awesome Han Solo chocolates!

His wife made these delicious Obi-wan Kabobies.

Someone else brought meat-on-meat, so we named Jar Jar Links.

We got tequila lime chicken wings from Costco - Chi-X-en Wing Fighters :)

Finally, dessert. My friend made these cute and delicious tie fighter s'mores.

She also brought the coolest bottle of wine ever...

All in all it was a terrific night of awesome food, great friends, and a totally epic movie.
Sunday, April 26, 2015
Asian Salad
It's Sunday again, which means another Family Dinner! This week we went with an Asian theme: fried rice, potstickers, and by special request - my asian salad.
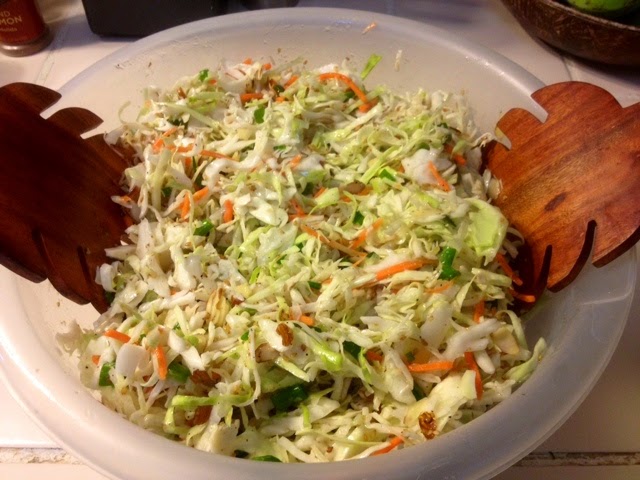


Well, it's not really MY salad. It is a recipe I got from my mom over a decade ago! Our church came out with a cookbook and this is just ONE of the yummy dishes she submitted.
And she'll tell you that this isn't really her recipe either. She got it from a friend many years before at a ladies recipe exchange at our old church.
Now the cycle continues as I pass it on to you in the 21st century form of the cookbook and recipe exchanges - blogging and Pinterest!
You only need 4 ingredients to make the salad. The original recipe calls for Ramen noodles, but this time around I am changed it up. In place of the dry ramen noodles I am used chow mien noodles for a different kind of crunch (and hopefully one that won't hurt my jaw as much!)
Then comes the dressing...
The sugar mixed with the vinegar gives the salad a sweet and tangy taste. And who doesn't love sesame seeds!
Mix it all together in a jar and you are good to go! The sugar likes to stick to the bottom so you really have to shake it up good!
When you're ready, pour the dressing on top of you salad and you have a scrumptious, delicious salad fit for fried rice and potstickers (and really anything else!)
Here is the "original" recipe I used from my mom:
Monday, April 20, 2015
A "Match" Made in Teacher Heaven
This week's post is mainly for my teacher friends, but if you are a fan of games and math then this is for you too!


A few years ago I learned about the most amazing game for "transitions". I learned this from a fellow Kindergarten teacher... and if Kindergarteners can do it than anyone can!
The game is just like "Memory" where you have to find pairs of cards that match. I put the memory game cards in a pocket chart. When kids transition to the carpet the game is played while kids get settled. Our "Teacher's Assistant" for the week leads the game by calling on students who are sitting quietly on the carpet. The student that is called on then has to use only their words to describe which cards the Teacher Assistant is to flip.
The game is just like "Memory" where you have to find pairs of cards that match. I put the memory game cards in a pocket chart. When kids transition to the carpet the game is played while kids get settled. Our "Teacher's Assistant" for the week leads the game by calling on students who are sitting quietly on the carpet. The student that is called on then has to use only their words to describe which cards the Teacher Assistant is to flip.
This pocket chart works really well because kids can say things like "the first one in the blue column" or "the third one in the yellow column.
When a student guesses a match correctly they get to keep the cards until we transition back to our desks.
My favorite aspect of this activity is that the students are completely self-sufficient. The first few times playing the game I had to be the one flipping the cards, but once they understood how it all worked I have nothing to do with it! Now whenever the kids transition to the carpet they play the game until I am ready for whatever lesson comes next. It is so helpful to have a few extra minutes embedded into the day to get things organized! I even use this game as a station during our math centers!
The great thing about this is that you can incorporate any kind of content! We are currently working on our math fluency so I made a set of doubles and doubles plus one cards.
You can download the cards for free at my TeachersPayTeachers store. You can print them right on to card stock or glue them on to pretty paper like I did :) Just click on the link below!
Wednesday, April 8, 2015
Not Just a Rice Cooker
When it comes to cooking I am a huge fan of anything I can turn on and then walk away from. Sure, on the weekends, when I have time I like to spend it cooking, baking, and prepping for the week. But the weekdays are another story. Mornings are always a tight schedule and evenings I am just exhausted from a long day of teaching. My rice cooker comes in quite handy every day after work. Just put the stuff in, turn it on, and you're good to go. So when I discovered that a rice cooker could cook other things besides rice, this little contraption started working double duty. Now I use my rice cooker every morning as well! For what you might ask? Oatmeal!


Yes! Oatmeal!
I start with a cup or cup and a half of oats.
Then I add water... Double what I did for oats. 1 cup oats to 2 cups water; 1.5 cup oats to 3 cups water. Sometimes I throw a splash of vanilla in there too.
Now here is the funny thing. I learned that you have to cook it with the lid OFF. My oatmeal kept bubbling over and spilling over the sides. It was a real mess. Without the lid it does just fine.
Then just turn it on and in about ten minutes or so you've got ready to eat oatmeal! And the best part is you can just walk away and come back when you are ready!
My husband and I take ours on the go. I place it in a traveling mug with a little cinnamon and honey, and we've got a hot warm meal that will keep us full until lunch!
Yummy!
Monday, March 16, 2015
Haupia Pi Day
This has been the first year that I have actually celebrated Pi Day. But hey, give me a break, I teach 5 and 6 year olds so my brain is focused on Dr. Seuss Day and Johnny Appleseed Day! Luckily for me, I have friends who a Pi Day enthusiasts! For my first Pi Day celebration I decided to make a Haupia Sweet Potato Pie. Doesn't that look delicious!


I then mixed the mashed potato with brown sugar, eggs, evaporated milk, and some spices. This then went on top of the graham cracker crust and in to the oven.


I have never made a three layer anything, so this task seemed a bit daunting. I was pleasantly surprised by how simple it actually was. The bottom layer is a graham cracker crust. It's just ground up graham cracker and melted butter!
Once I put the crust in the oven it was time to move on to the next layer: the sweet potato.
I have two large okinawan sweet potatoes in half and placed them in a pot to boil. You don't even need to peel them. Once they were boiled (and cooled) the skin peels right off!
I then mixed the mashed potato with brown sugar, eggs, evaporated milk, and some spices. This then went on top of the graham cracker crust and in to the oven.
Now it was time for the haupia. Mmmm mmmm. I love haupia! And now that I know how easy it is to make it is gonna be a regular in this household. All it takes is a can of coconut milk, sugar, and cornstarch.
When the sweet potato was cooked and cooled I poured the haupia mixture on top and placed it in the fridge.
All night and the next morning I thought about eating this magnificent pie. And it did not disappoint. It was fantastic and quite beautiful if I do say so myself!
Here is the recipe I used if you want to give it a try yourself. It is really easy, however it does take a couple hours total cause you need to cook and cool all the different layers. Definitely a weekend time dessert!
Saturday, March 7, 2015
Teachers Pay Teachers
If you are a teacher, then you have probably heard of an awesome site called "Teachers Pay Teachers". If you haven't heard of it, "Teachers Pay Teachers" is a way for teachers to share and sell the products they have made with other teachers to use. Over the years I have found a whole bunch of great activities and worksheets that have been created by other teachers to use in my classroom.
And now it's time to give back...
I decided that it was time that I shared the (limited) fruits of my labor when it comes to teacher made materials. I created my own store on "Teachers Pay Teachers" and uploaded my first product! Earlier this year I had made some literacy awards for my class. Whenever students were making good decisions or answered questions they received one of these awards. Each award had a particular task for the students to accomplish. I made ones for rhyming and ones of finding synonyms.

If you are a teacher and want to try out these literacy awards you can download them for free at the link below:
https://www.teacherspayteachers.com/Product/Literacy-Awards-1752243
If you are also interested in becoming a seller on "Teachers Pay Teachers" you can click on my referral link below:
https://www.teacherspayteachers.com/Signup/referral:jennincr12
Happy Teaching!
And now it's time to give back...
I decided that it was time that I shared the (limited) fruits of my labor when it comes to teacher made materials. I created my own store on "Teachers Pay Teachers" and uploaded my first product! Earlier this year I had made some literacy awards for my class. Whenever students were making good decisions or answered questions they received one of these awards. Each award had a particular task for the students to accomplish. I made ones for rhyming and ones of finding synonyms.
If you are a teacher and want to try out these literacy awards you can download them for free at the link below:
https://www.teacherspayteachers.com/Product/Literacy-Awards-1752243
If you are also interested in becoming a seller on "Teachers Pay Teachers" you can click on my referral link below:
https://www.teacherspayteachers.com/Signup/referral:jennincr12
Happy Teaching!
Sunday, March 1, 2015
Plans for Dinner
I don't know about you, but I find that trying to figure out what to make for dinner can be one of the most tiresome decisions there is. I find this especially true after a long day of working with first graders, and by the time I get home I have no brain power left in me.
At the beginning of the school year I tried to use a meal planning template I found on Pinterest. I put it in a picture frame so that I could write on it with whiteboard marker.

I was diligent with it for a few weeks, and then I ended up going about an entire semester without changing it.
Last week I decided to give it another go. It helped me plan out the main courses for the week but that was it. When it came time to cook dinner, I made the main course and then when it was all over I would realize I forgot to make rice or I forget to make veggies to go with it. I am also using a couple of new cookbooks, and I would have to search and search just to find the recipes I wanted before I could even start cooking. That was really frustrating.
So, when I went to redo our meal planner for this week, I decided that this format wasn't going to work for me. It may be cute, but it just isn't efficient. I wanted to be able to plan out all the components to dinner (entree, side, veggie) and have enough space to write where I could find the recipe. I also wanted to have room to start compiling a grocery list as I planned out the week's meals. Finally, I wanted to be able to have it as a file on my computer so that I could edit it each week (and not have to write it out by hand.) I scoured the internet looking for something that filled my requirements but to no avail. There wasn't much that I liked, and when I did find something I liked the file either wasn't editable or didn't work at all. This led me to create one myself, and that way I could make it just how I wanted it.

If you have the same requirements for a weekly meal planner as I do, then I am more than welcome to share! Just click on the link below, and you will be able to download the template version to you own computer!
Weekly Meal Planner
Happy meal planning!
At the beginning of the school year I tried to use a meal planning template I found on Pinterest. I put it in a picture frame so that I could write on it with whiteboard marker.
Last week I decided to give it another go. It helped me plan out the main courses for the week but that was it. When it came time to cook dinner, I made the main course and then when it was all over I would realize I forgot to make rice or I forget to make veggies to go with it. I am also using a couple of new cookbooks, and I would have to search and search just to find the recipes I wanted before I could even start cooking. That was really frustrating.
So, when I went to redo our meal planner for this week, I decided that this format wasn't going to work for me. It may be cute, but it just isn't efficient. I wanted to be able to plan out all the components to dinner (entree, side, veggie) and have enough space to write where I could find the recipe. I also wanted to have room to start compiling a grocery list as I planned out the week's meals. Finally, I wanted to be able to have it as a file on my computer so that I could edit it each week (and not have to write it out by hand.) I scoured the internet looking for something that filled my requirements but to no avail. There wasn't much that I liked, and when I did find something I liked the file either wasn't editable or didn't work at all. This led me to create one myself, and that way I could make it just how I wanted it.
If you have the same requirements for a weekly meal planner as I do, then I am more than welcome to share! Just click on the link below, and you will be able to download the template version to you own computer!
Weekly Meal Planner
Happy meal planning!
Subscribe to:
Posts (Atom)